| Machines aren’t supposed to break, and
mechanical components such as shafts, fasteners, and structures aren’t
supposed to fail. But when they do fail, they can tell us exactly
why.
It may sound a little far-fetched, but experts
say that the causes for more than 90% of all plant failures can be
detected with a careful physical examination using low power magnification
and some basic physical testing. Inspection of the failure will show the
forces involved, whether the load applied cyclically or was single
overload, the direction of the critical load, and the influence of outside
forces such as residual stresses or corrosion. Then, accurately knowing
the physical roots of the failure, you can pursue both the human errors
and the latent causes of these physical roots.
UNDERSTANDING THE BASICS
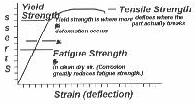
Before explaining how to diagnose a failure, we
should review the effects of stress on a part. When a load is put on a
part, it distorts. In a sound design the load isn’t excessive, the stress
doesn’t exceed the "yield point", and the part deforms elastically, i.e.,
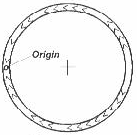
when the load is released the part returns to its original shape. This is
shown in Figure 1, a "stress-strain" diagram that shows the
relationship between loads and deformation.
In a good design, the part operates in the
elastic range, the area between the origin and the yield strength, the
part will be permanently deformed. Even greater increases in load will
cause the part to actually break.
Figure 1 illustrates a very
basic point of design, and applies when the load on a part is relatively
constant, such as the load on the frame of a building or the stress in the
legs of your desk. It is a very different case when fluctuating loads are
applied, such as those in a hydraulic cylinder or in an automotive
connecting rod. These fluctuating loads are called fatigue loads, and when
the fatigue strength is exceeded, a crack can develop. This fatigue crack
can slowly work its way across a part until a fracture occurs. (Corrosion
can greatly affect the fatigue strength).
Figure
1
Machine components can fracture from either a
single overload force or from fatigue forces. Looking at the failure face
will tell which of these was involved. A single overload can result in
either a ductile fracture or a brittle fracture.
DUCTILE OVERLOAD VS. BRITTLE OVERLOAD
FAILURES
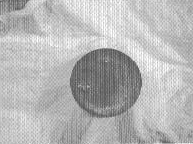
A "ductile failure" is one where there is a
great deal of distortion of the failed part. Commonly, a ductile part
fails when it distorts and can no longer carry the needed load, like an
overloaded steel coat hanger. However, some ductile parts break into two
pieces and can be identified because there is a great deal of distortion
around the fracture face, similar to what would happen if you tried to put
too much load on a low carbon steel bolt.
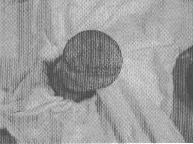
The term "brittle fracture" is used when a part
is overloaded and breaks with no visible distortion. This can happen
because the material is very brittle, such as gray cast iron or hardened
steel, or when a load is applied extremely rapidly to a normally ductile
part. A severe shock load on the most ductile piece can cause it to
fracture like glass.
An important point about failures is that the
way the load is applied, i.e., the direction and the type, can be
diagnosed by looking at the failure face. A crack will always grow
perpendicular to the plane of maximum stress. Below we show examples of
the difference in appearance between ductile overload and brittle overload
failures.
Figure
2
From the examples above in Figure 2, we
know we can look at an overload failure and knowing the type of material,
tell the direction of the forces that caused the failure. Common
industrial materials that are ductile include most aluminum and copper
alloys, steels and stainless steels that are not hardened, most
non-ferrous metals, and many plastics. Brittle materials include cast
irons, hardened steel parts, high strength alloyed non-ferrous metals,
ceramics, and glass.
One note of caution is that the type of
fracture, ductile or brittle, should be compared with the nature of the
material. There are some instances where brittle fractures appear in
normally ductile materials. This indicates that either the load was
applied very rapidly or some change has occurred in the material, such as
low temperature embrittlement, and the material is no longer ductile. An
example of this was a low carbon steel clip used to hold a conduit in
position in a refrigerated (-50 F) warehouse. The clip was made from a
very ductile material, yet it failed in a brittle manner. The
investigation showed it had been hit by a hammer, a blow that would have
deformed it at normal temperatures.
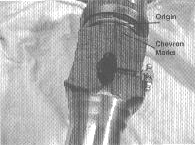
In a brittle overload failure, separation of
the two halves isn’t quite instantaneous, but proceeds at a tremendous
rate, nearly at the speed of sound in the material. The crack begins at
the point of maximum stress, then grows across by cleavage of the
individual material grains. One of the results of this is that the
direction of the fracture path is frequently indicated by chevron marks
that point toward the origin of the failure. Example 1 is a
photograph of the input shaft of a reducer where the chevron marks clearly
point toward the failure origin, while Figure 3 is a sketch of the
cross section of the wall of a ruptured 20ft. (6.1 m.) diameter vessel. In
both cases, by tracing the chevron marks back to their origin, we knew
exactly where to take samples to determine if there was a metallurgical
problem.
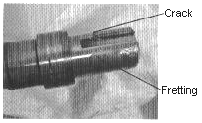
|
Notice how the chevron marks
(high-lighted) point toward the origin of the
fracture. |
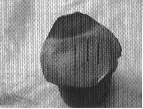
Example
1 |
Figure
3 |
FATIGUE FAILURES
So far we’ve talked about the gross overloads
that can result in immediate, almost instantaneous, catastrophic failures.
A very important distinction is that fatigue cracks take time to grow
across a part. In a fatigue failure, an incident of a problem can exceed
the material’s fatigue strength and initiate a crack that will not result
in a catastrophic failure for millions of cycles. We have seen fatigue
failures in 1200 rpm motor shafts that took less than 12 hours from
installation to final fracture, about 830,000 cycles. On the other hand,
we have also monitored crack growth in slowly rotating process equipment
shafts that has taken many months and more than 10,000,000 cycles to
fail.
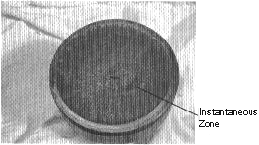
Figure 4 shows a simple fatigue crack with
the different growth zones and the major physical features.
The fatigue zone is typically much smoother
than the instantaneous zone, which is usually brittle and crystalline in
appearance. Progression marks are an indication that the growth rate
changed as the crack grew across the shaft and don’t appear on many
failure faces.
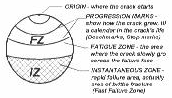
Figure
4
There are some complex mechanisms involved in
the initiation of a fatigue crack and once the crack starts, it is almost
impossible to stop because of the stress concentration at the
tip.
STRESS CONCENTRATION
A stress concentration is a physical or
metallurgical condition that increases the local stress in the part by
some factor. A good example is the shaft shown in Figure 5. We see that
the stress in the area of the radius varies depending on the size of the
radius. A small radius can increase the stress dramatically.
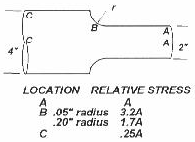
Figure
5
Stress concentrations, indicated by the symbol
Kt, can be caused by changes in metallurgy, internal defects, or changes
in shape. There is extensive data that indicates that the resultant values
depends on both the type of stress, i.e., bending, torsion, etc., and the
general shape of the part.
Stress concentrations have a great effect on
crack initiation because of their effect on increasing the local stress.
The crack can start solely as the effect of the operating loads or it can
be multiplied by the stress concentration factor.
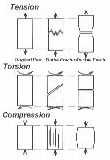
WHAT TYPE OF LOAD WAS IT?
The face of a fatigue failure tells us both the
type (bending, tension, torsion or a combination) and the magnitude of the
load. To understand the type of load, look at the direction of crack
propagation. It is always going to be perpendicular to the plane of
maximum stress. The four examples in Figure 6 reflects four common
fracture paths.
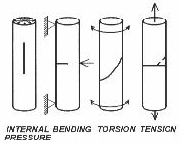
Figure
6
Figure 6 brings up the question "what type
of bending?" Was it one-way plane bending, like a leaf spring or a diving
board, or was it rotating bending, such as a motor shaft with a heavy belt
load? As seen in Figure 7, looking at the fracture face again tells
us the type of load. Notice that "rotating load" on the right causes the
crack to grow in a non-uniform manner. In general, when the divider of the
instantaneous zone does not point to the origin, it shows there was a
rotating bending involved in the failure cause.
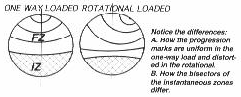
Figure
7
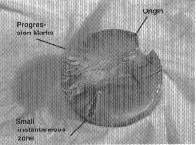
HOW HEAVILY WAS IT LOADED?
Fatigue failures almost always start on the
outside of a shaft at a stress concentration, because the local stress is
increased. However, the instantaneous zone (IZ) carries the load in the
instant before the part breaks. By looking at the size of the IZ, you can
tell the magnitude of the load on the part. Figure 8 shows a
comparison between a lightly and a heavily loaded shaft for both plain
bending and rotational bending.
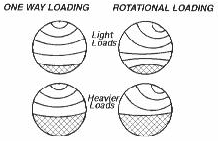
Figure
8
THE EFFECT OF STRESS CONCENTRATIONS ON A
FRACTURE FACE
If a part is relatively lightly stressed, the
cracking will start at only one point and the result will look like one of
the examples above. However, if a shaft is more heavily loaded, then
cracks can start in several places and work their way across the part. In
Figure 9 we see a sketch of a rotating shaft that failed in only a
few weeks. Inspecting it, you can see the instantaneous zone is very
small, indicating it wasn’t highly stressed. Also, the crack is straight
across the shaft, showing the cause was a bending load. But if the load
was light, why did the shaft fail? The answer is stress
concentrations.
Figure
9
Looking at the fracture face, you see a series
of ratchet marks. These are the boundaries between adjacent fracture
planes, i.e., between each pair of ratchet marks is a fracture origin, and
as these individual cracks grow inward they eventually join together on a
single plane. The small instantaneous zone indicates the stress at the
time when the shaft finally broke was low, but the multiple origins and
the ratchet marks show us there was enough stress to cause cracking at
many points around the perimeter almost simultaneously.
From this you can conclude that there must have
been a significant stress concentration. (The calculated stress
concentration was in the range of 4.0, so the stress in the area of those
origins was four times as much as it should have been.)
With this information on the type of load and
the magnitude of the load, we can start looking at some failures and
diagnosing where they came from. Following are some examples of failures
and an explanation of their causes.
About the Author
Neville Sachs, P.E., is President of Sachs,
Salvaterra & Associates, Inc., which was founded in 1986. The
consulting firm specializes in improved plant and equipment reliability
and technical support services. Among the firm’s capabilities are
vibration monitoring, mechanical failure anlaysis, corrosion and materials
engineering, design reliability analysis and a wide variety of
nondestructive examination methods. Previously, Neville was Supervisor,
Reliability Engineering for Allied Signal Corporation where he was
instrumental in developing one of the first large predictive maintenance
inspection programs in the nation. Mr. Sachs received a Bachelor of
Engineering Degrees in both Mechanical and Chemical Engineering from
Stevens Institute of Technology. Visit his web site at
http://www.sachssalvaterra.com. |